How to Clean Oven Racks Without Damaging the Finish
Remove baked-on soil while protecting rack coatings, glides, tubs and nearby surfaces.
Let racks cool, confirm whether they are standard, porcelain-coated or telescoping, remove them as the manual directs, soak only compatible non-telescoping racks in warm detergent solution, scrub with a non-scratch pad, rinse and dry completely.
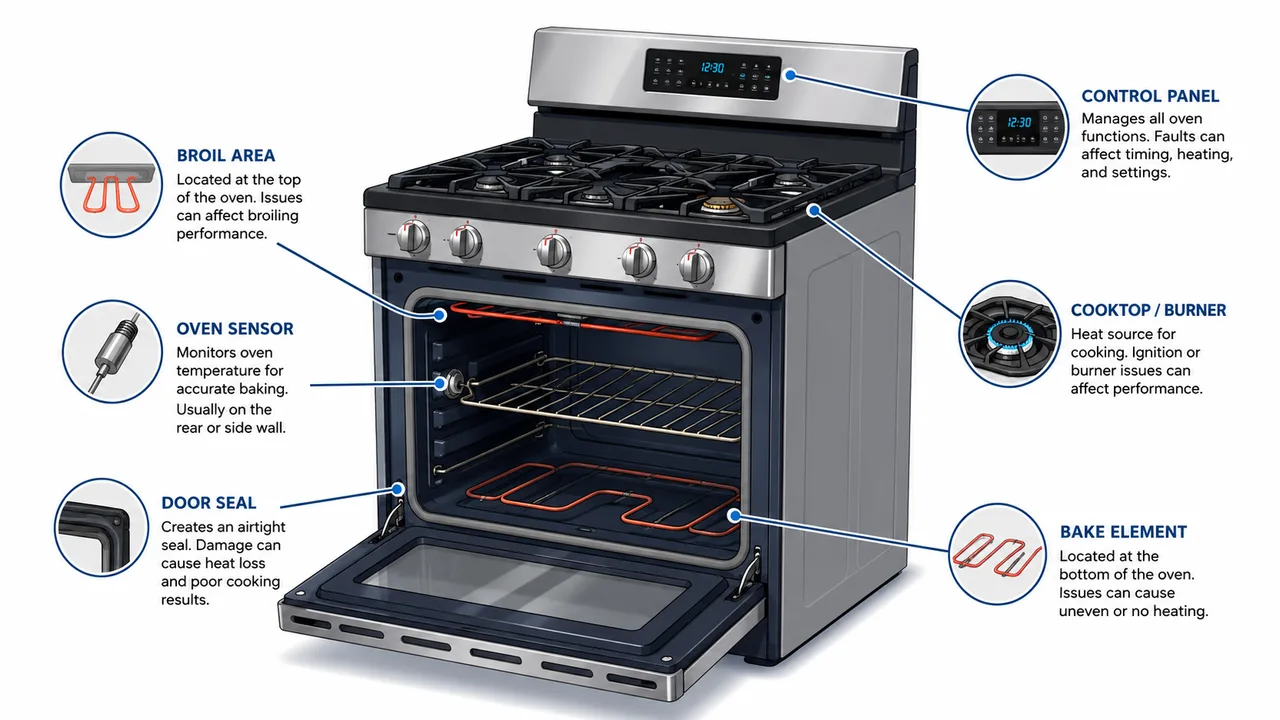
Use the illustration together with the fast answer and safe-check section so you inspect the right area before buying parts, using cleaners or calling for service.
Practical repair plan for How to Clean Oven Racks Without Damaging the Finish
This article is organized to help a reader move from symptom to action without guessing. The goal is not to push a part replacement. The goal is to confirm the symptom, understand what the observation means, run only safe checks, contain the problem, choose the next step and know when a qualified specialist is the safer option.
Difficulty level
Beginner if the material is confirmed; stop for delicate or unknown surfaces. Treat the first pass as diagnosis, not repair. A repair becomes advanced when it requires live electrical testing, fuel adjustment, refrigerant work, sealed-system access, structural opening, spring tension, pressure vessels, heavy lifting or manufacturer-only calibration.
Most likely issue type
This page belongs to cleaning / material care. In practical terms, the most likely cause is usually one of four groups: setup or use condition, blocked input or output path, failed protection/sensor signal, or an internal component that needs model-specific testing.
Safety boundary
Stop immediately for chemical incompatibility, discoloration, etching, fumes, slippery residue or permanent surface damage. A red warning sign means the correct result is not another internet step; it is making the area safe and involving the right professional.
Best first decision
Start with what changed recently. A new filter, moved appliance, recent cleaning, power outage, heavy load, construction dust, freezing weather, clogged drain, closed valve, closed vent or changed setting often explains a problem before any part has failed.
Tools and materials to gather before you start
Gathering simple items first keeps the diagnosis calm and prevents damage caused by rushing. Do not buy a replacement part until a check below points to that part or a professional confirms it.
Useful tools
- microfiber cloths
- soft brush
- spray bottle
- small bowl
- timer
- protective gloves
- camera for before/after photos
Possible materials
- water
- mild dish soap
- material-safe cleaner
- white cloth for blot testing
- neutral rinse water
- dry towel
The diagnosis: what symptom are you actually confirming?
For How to Clean Oven Racks Without Damaging the Finish, the symptom is the starting point, not the conclusion. A useful diagnosis separates what you directly observed from what you assume has failed. Write the observation in plain language: when it starts, how long it takes, what happened immediately before it, whether the condition is constant or intermittent, and whether anything changed after a safe external correction.
Good symptom notes include the condition of the surrounding area. Check whether the floor is wet, the cabinet is warm, the panel is unresponsive, the room smells unusual, the surface changed color, the sound occurs once or repeatedly, or the problem appears only after a heavy load or long cycle. Those details often separate a simple maintenance issue from a deeper mechanical, electrical, plumbing or structural issue.
Photograph the model tag, the affected area and any display or warning light. Photos prevent two common mistakes: ordering a part for the wrong model and describing a symptom differently each time. They also help a technician or specialist decide whether the visit needs parts, safety equipment or a different trade.
Fast step-by-step path
- Confirm the exact symptom. Write down what you see, hear and smell before touching the surface or material.
- Make the area safe. Stop using products if the material changes color, softens, becomes cloudy or produces fumes before touching accessible panels, water paths, filters, vents or nearby surfaces.
- Find the model number, owner manual, installation details and any recent service history.
- Check the easy external conditions first: settings, access, airflow, water flow, drainage, seals, filters, clearances, level and visible debris.
- Change only one condition at a time, then repeat a short, safe observation under the same conditions.
- Interpret the result before buying a part. If the behavior did not change, the first visible part may not be the cause.
- Contain the issue so it does not spread to flooring, cabinets, walls, wiring or stored items.
- Use the professional handoff checklist if the next step requires live voltage, gas, refrigerant, structural opening, sealed components or heavy lifting.
What each result means
Each safe check should answer a question. If clearing debris, opening airflow, correcting a setting, resetting a normal user control, drying an area or redistributing a load changes the symptom, the issue was probably not a failed major component. If nothing changes and the same stage fails again, the remaining cause is more likely inside the surface or material or tied to a model-specific sensor, switch, valve, motor, control, drain, vent or sealed path.
| Observation | What it usually means | Safer next move |
|---|---|---|
| The how to clean oven racks without damaging the finish pattern changes after cleaning or clearing access points. | The cause is more likely maintenance, blockage, airflow, water flow, loading, leveling, settings or another external condition. | Repeat one normal use, document the change and add the related prevention task. |
| The how to clean oven racks without damaging the finish pattern returns at exactly the same stage. | A specific control, sensor, interlock, valve, motor, drain, vent, seal or internal path may be failing at that stage. | Stop replacing random parts and narrow the stage with model information or professional testing. |
| The symptom includes heat, smoke, odor, water near electricity, active leaking, arcing, gas smell or repeated breaker trips. | The problem has moved beyond normal homeowner troubleshooting. | Stop use, make the area safe from outside the hazard, and call the correct professional. |
| The issue only happens under high load, long run time, heavy use, hot weather or after recent work. | Load, installation, airflow, drainage, thermal protection or a changed setup may be part of the cause. | Compare with a light controlled test only if safe, and inspect recent changes first. |
The key is to avoid treating one symptom as proof of one part. A blocked outlet can make a pump sound weak. A dirty filter can make a motor or compressor look defective. A loose door, latch or seal can make a control board look confused. A protection trip can be the correct response to an unsafe condition. When the result does not clearly support a part, do not buy the part yet.
Contain the problem so it does not get worse
Containment is different from repair. Containment protects the home while you decide the next step. If water is involved, keep it away from electrical components, flooring edges, cabinets and wall cavities. If heat is involved, let the system cool and keep combustible items away. If the issue involves odor, smoke, chemical residue or suspected contamination, ventilate only when safe and avoid spreading residue through the home.
For a surface or material, containment often means stopping use, documenting the condition, removing nearby stored items, drying only the surrounding area, placing a towel or shallow pan where it will not create a slip or electrical risk, and leaving the failed component untouched until the cause is known. Do not seal, tape, caulk, paint or cover damage before the source is identified. Cosmetic fixes can hide active moisture, heat damage or movement and make the final repair more expensive.
If the symptom is intermittent, containment also means limiting repeated tests. Repeated starts can overheat a motor, erase error history, flood a drain path, worsen a leak, trip protection devices or make a dangerous condition appear normal. Run only the minimum safe comparison needed to understand whether an external correction changed the result.
Repair options that make sense
The most reasonable repair path depends on what the safe checks prove. If the cause is access, cleaning, a clogged filter, a closed valve, blocked venting, a dirty surface, an overloaded load, a kinked hose, a loose support, a failed consumable or a missed maintenance task, the homeowner may be able to correct it with the manual open and the system safely shut down. If the cause requires measuring live voltage, opening sealed compartments, replacing internal wiring, handling refrigerant, adjusting gas combustion, lifting heavy equipment or disturbing structural materials, the safer repair is professional service.
Before approving a repair, compare three things: the confirmed fault, the age and condition of the system, and the total cost after diagnosis, labor, parts, return visit risk and collateral damage are included. A small part can become a poor repair if the surrounding system is worn, unsafe or near end of life. A more expensive repair can be reasonable when the system is newer, the diagnosis is confirmed and the failure did not damage other areas.
Do not use the article as a substitute for the model-specific manual. The page explains how to reason through How to Clean Oven Racks Without Damaging the Finish, but manufacturers change access panels, service modes, sensors, part revisions, reset sequences and safety instructions. The model number and owner manual take priority whenever a procedure differs.
When to call a professional
Call a qualified professional when the next step requires access you cannot reach safely, when the same fault returns after simple checks, or when the observation points to electricity, gas, refrigerant, combustion, structural damage, active flooding, sewage, mold, spring tension, pressure vessels or hidden moisture. A professional is also the right call when a repair must be documented for insurance, warranty, rental property rules or resale disclosure.
Give the professional a concise handoff: the exact title-level symptom, model number, photos, what you checked, what changed, what did not change, whether the problem is intermittent, and whether any warning signs appeared. That handoff can reduce diagnostic time and help the technician arrive with the right tools or parts.
How to prevent the problem from returning
Prevention works best when it targets the actual cause. If the cause was blockage, schedule cleaning. If the cause was installation, correct the slope, clearance, connection, level or support. If the cause was loading or use pattern, change the habit that created the stress. If the cause was age, track symptoms more often and compare repair cost against replacement before failures become emergencies.
For most cleaning / material care topics, a monthly visual check and seasonal deeper check are enough to catch many problems early. Keep filters, vents, drains, seals, caulk lines, accessible coils, hoses, cords and shutoff points visible. Do not store items tightly around equipment that needs airflow or access. Keep photos of the normal condition so slow changes stand out. Record the date of cleaning, part replacement, filter change, service visit or water event.
After a repair, run one normal use and inspect the surrounding area again. Look for moisture, odor, heat, vibration, new noise, repeated codes or anything that changed from the baseline. A repair is not complete simply because the symptom disappeared once; it is complete when the cause is corrected and the system operates normally under expected conditions.
Related next steps
If this article is the first page you opened, use the related paths below to continue without guessing. Move from symptom to component, from component to cost, and from cost to repair-or-replace only after the safety checks are complete.
Confirm the model and access
Use the owner manual to confirm that the part is removable and homeowner serviceable. Photograph its orientation, protect floors and cabinetry, and isolate power or fuel as the instructions require. Cleaning access varies: a similar-looking filter, vent connection or rack can release differently on another model.
Step-by-step method
Let racks cool, confirm whether they are standard, porcelain-coated or telescoping, remove them as the manual directs, soak only compatible non-telescoping racks in warm detergent solution, scrub with a non-scratch pad, rinse and dry completely.
- Remove loose debris before adding water or cleaner.
- Use the mildest compatible product and a soft nonabrasive tool.
- Keep liquids away from electrical openings, motors and unsealed cabinet areas.
- Rinse or remove cleaning residue.
- Dry, reinstall in the original position and complete one observed test.
What to avoid
Do not leave telescoping glides submerged, use oven cleaner unless the rack manufacturer permits it, mix chemicals, or use abrasives that remove plating/coating.
Stop for damaged wiring, gas odor, scorched lint, a cracked component, standing water near electrical parts or access that does not match the owner manual.
How to judge the result
Normal operation should return without new leakage, odor, heat or abnormal sound. A filter that quickly blocks again, a vent with weak outdoor airflow, or racks that bind after cleaning points to another condition that needs diagnosis. Do not treat repeated cleaning as a substitute for repair.
Document the maintenance result
Record the date, model, amount and type of buildup, products used and any change in cycle time, airflow, odor or drainage. This creates a baseline for the next service interval. If buildup returns unusually quickly, investigate loading, detergent, vent geometry, household conditions or an equipment fault rather than shortening the interval indefinitely.
Protect connected systems
Appliance cleaning often affects a connected drain, vent, cabinet or electrical area. Recheck the floor, hose, duct joint, exterior termination and nearby surfaces after the controlled test. A clean removable part does not correct a blocked concealed line, damaged duct, failing seal or weak pump.
Diagnosis, fix path and prevention
This section is written to make the page useful in the moment: identify the likely problem, run only safe checks, understand what each result means, choose the best next step and prevent the same failure from coming back.
Most likely problem
The most likely problem is either removable soil on the surface or material damage that cleaning cannot reverse.
Safe checks before replacing parts
Identify the surface, test a hidden spot, avoid mixing chemicals, start mild, control moisture and follow the product label for gloves and ventilation.
- recreate the symptom once only if safe
- record stage, sound, display, water/air/heat behavior and recent changes
- check only owner-accessible items before considering parts
What each result means
Improvement during a patch test means the method is compatible. Color transfer, dulling, swelling, etching or spreading means stop. No change may mean permanent damage or embedded contamination.
- same-stage failure narrows diagnosis
- change after a safe correction points setup/maintenance
- persistence after safe checks points component or professional diagnosis
Best next step
Use the least aggressive method that works and escalate one variable at a time: chemistry, dwell time or gentle agitation. Do not jump from mild cleaning to abrasion.
When to stop
Stop and call a qualified professional for gas odor, delayed ignition boom, sparking, damaged wiring, breaker trips, smoke from controls or gas-line work. Also stop whenever the next step would bypass a safety control, expose live voltage, open a sealed system, disturb gas or combustion, enter a flooded electrical area or require unsafe access.
How to prevent it
Prevent recurrence by fixing the condition that caused the failure, not just the visible symptom. For this topic, the most useful habits are: keep vents open, clean spills after cooling, avoid foil that blocks airflow and inspect the gasket before heavy use. Recheck after the first normal use and add recurring tasks to a maintenance calendar.
Quick decision table
| Observation | What it usually means | Safer next move |
|---|---|---|
| The symptom changes after a simple external correction. | The cause was likely setup, blockage, cleaning, loading, airflow, water flow or access related. | Repeat one normal use and add the prevention task to your schedule. |
| The same stage fails again after safe checks. | The remaining cause is more likely a component, sensor, control, internal path or installation issue. | Use the related component/cost guide or request model-specific service. |
| The symptom includes a safety warning sign. | The risk is no longer a normal homeowner diagnostic problem. | Stop using the system and call the appropriate qualified professional. |
Additional practical notes for How to Clean Oven Racks Without Damaging the Finish
Access And Visibility: When a reader arrives at this page, they are usually trying to decide whether how to clean oven racks without damaging the finish is a quick maintenance issue, a repair worth attempting, or a warning sign that requires help. The safest way to answer that question is to keep the investigation visible and reversible. Visible means you can explain each observation without removing protected covers. Reversible means you can put the system back the way it was if the check does not change anything.
Common False Positives: The practical order is always evidence before action. Evidence includes the model number, the exact stage of failure, the condition of surrounding materials, the timing of the symptom and any recent changes in use, weather, cleaning, installation, power, water, drainage or load. Action comes later, after the evidence points toward a narrow group of causes.
Containment Before Cosmetic Repair: A homeowner-friendly check should not require live measurement, gas adjustment, refrigerant handling, sealed-system work, internal wiring repair or force. If the next check requires one of those things, the check itself has answered the question: the problem is no longer a normal DIY diagnosis. That conclusion is useful because it prevents damage and avoids unnecessary parts.
Quote Preparation: Prevention is also part of repair. After the immediate issue is stable, identify the condition that allowed it to develop. For a surface or material, that condition may be blocked airflow, neglected cleaning, poor drainage, a missing clearance, a worn seal, an overloaded use pattern, water entering a material, delayed maintenance or an installation detail that has slowly moved out of tolerance.
Post-Repair Verification: The best outcome is a clear decision: correct a simple external condition, monitor with dates and photos, buy a confirmed consumable, request model-specific service, or replace the system when repair no longer makes economic or safety sense. Each of those decisions is better than guessing at the first part mentioned online.
Seasonal Prevention: When a reader arrives at this page, they are usually trying to decide whether how to clean oven racks without damaging the finish is a quick maintenance issue, a repair worth attempting, or a warning sign that requires help. The safest way to answer that question is to keep the investigation visible and reversible. Visible means you can explain each observation without removing protected covers. Reversible means you can put the system back the way it was if the check does not change anything.
Access And Visibility: The practical order is always evidence before action. Evidence includes the model number, the exact stage of failure, the condition of surrounding materials, the timing of the symptom and any recent changes in use, weather, cleaning, installation, power, water, drainage or load. Action comes later, after the evidence points toward a narrow group of causes.
Common False Positives: A homeowner-friendly check should not require live measurement, gas adjustment, refrigerant handling, sealed-system work, internal wiring repair or force. If the next check requires one of those things, the check itself has answered the question: the problem is no longer a normal DIY diagnosis. That conclusion is useful because it prevents damage and avoids unnecessary parts.
Containment Before Cosmetic Repair: Prevention is also part of repair. After the immediate issue is stable, identify the condition that allowed it to develop. For a surface or material, that condition may be blocked airflow, neglected cleaning, poor drainage, a missing clearance, a worn seal, an overloaded use pattern, water entering a material, delayed maintenance or an installation detail that has slowly moved out of tolerance.
Quote Preparation: The best outcome is a clear decision: correct a simple external condition, monitor with dates and photos, buy a confirmed consumable, request model-specific service, or replace the system when repair no longer makes economic or safety sense. Each of those decisions is better than guessing at the first part mentioned online.
Post-Repair Verification: When a reader arrives at this page, they are usually trying to decide whether how to clean oven racks without damaging the finish is a quick maintenance issue, a repair worth attempting, or a warning sign that requires help. The safest way to answer that question is to keep the investigation visible and reversible. Visible means you can explain each observation without removing protected covers. Reversible means you can put the system back the way it was if the check does not change anything.
Seasonal Prevention: The practical order is always evidence before action. Evidence includes the model number, the exact stage of failure, the condition of surrounding materials, the timing of the symptom and any recent changes in use, weather, cleaning, installation, power, water, drainage or load. Action comes later, after the evidence points toward a narrow group of causes.
Access And Visibility: A homeowner-friendly check should not require live measurement, gas adjustment, refrigerant handling, sealed-system work, internal wiring repair or force. If the next check requires one of those things, the check itself has answered the question: the problem is no longer a normal DIY diagnosis. That conclusion is useful because it prevents damage and avoids unnecessary parts.
Common False Positives: Prevention is also part of repair. After the immediate issue is stable, identify the condition that allowed it to develop. For a surface or material, that condition may be blocked airflow, neglected cleaning, poor drainage, a missing clearance, a worn seal, an overloaded use pattern, water entering a material, delayed maintenance or an installation detail that has slowly moved out of tolerance.
Containment Before Cosmetic Repair: The best outcome is a clear decision: correct a simple external condition, monitor with dates and photos, buy a confirmed consumable, request model-specific service, or replace the system when repair no longer makes economic or safety sense. Each of those decisions is better than guessing at the first part mentioned online.
Sources and standards
Match the method to the rack finish
Chrome-plated, porcelain-coated, enameled and specialty gliding racks do not tolerate the same chemistry or soaking time. Strong alkaline oven cleaner can discolor metal, attack coatings, remove lubricant from sliding mechanisms and damage nearby sinks or tubs. Check the appliance manual before using a self-clean cycle with racks installed; many manufacturers require racks to be removed.
Support the racks on towels or a protected surface, keep cleaners away from aluminum trim and telescoping bearings, and rinse until no slippery residue remains. Dry completely before reinstalling. If a rack binds afterward, use only the lubricant and procedure specified for that model rather than household oil, which can smoke or collect soil.
Replace instead of aggressively restoring
Deep corrosion, flaking coating, bent rails or damaged glides can affect stability and cookware support. In those cases, replacement with the correct model-specific rack is safer than grinding, painting or applying an unknown high-temperature coating.